
Connecting to things that are far away, especially small devices that make up the "Internet of Things" (IoT), truly requires a way to keep those connections safe. You see, when your smart gadgets, sensors, or little computers are out there, perhaps in a factory, on a farm, or just across your home, they often hold important information or control things you care about. Without a strong security layer, anyone could potentially peek at your data or even take charge of your devices, and that's just not something anyone wants, you know?
This need for a secure link is where the concept of using something like SSH for your remote IoT example comes into its own. It provides a protected path for you to talk to your devices, send them new instructions, or fetch information from them, all while making sure no unwanted eyes are looking in. It's a bit like having a secret handshake and a coded message system for all your remote gadgets, so, it's pretty neat.
Today, we will explore how SSH makes this secure connection possible for your IoT projects. We will look at how to set things up, how to move files back and forth, and even how to fix common problems that might pop up along the way. It's about giving you the ability to manage your remote devices with peace of mind, which is actually very helpful.
Table of Contents
- What is SSH and Why It Matters for IoT
- Setting Up SSH on Your IoT Device
- Connecting from Your Computer to the IoT Device
- Secure File Transfers with SSH for IoT
- Managing SSH Keys for Better Security
- Troubleshooting Common SSH Challenges
- Advanced SSH Uses for Your IoT Setup
- Frequently Asked Questions about SSH and IoT
What is SSH and Why It Matters for IoT
SSH, which is short for Secure Shell, is a protocol that helps you connect to a computer that is far away, and it does this in a way that keeps things safe, even when the network itself might not be. The ssh command provides a secure encrypted connection between two hosts over an insecure network, and this is pretty fundamental to how it works, you know? It creates a kind of private tunnel where your information can travel without others seeing it.
This connection can also be used for terminal access, which means you can type commands as if you were sitting right in front of the remote machine. It is also great for file transfers, so you can move documents or programs back and forth, and for tunneling, which lets you send other types of network traffic through that same secure path. Ssh is a software package that enables secure system administration and file transfers over insecure networks, and it's actually used in nearly every data center and in every large enterprise, so, it's a big deal.
The Core of SSH Security
At its heart, SSH is all about making sure that when you connect to a remote device, your communication stays private and protected from unwanted interference. The protocol sets up encrypted connections for remote logins and file transfers between computers, and this is done using some clever math to scramble and unscramble the information. It helps prevent things like someone listening in on your conversations or trying to pretend to be your device, which is very important.
This strong security is achieved through various mechanisms, including robust encryption and different ways to prove who you are. The way it handles these things is a bit like having a secret codebook that only you and the remote machine share, making sure only authorized people can access it. 本文深入讲解SSH协议原理,包括安全机制、安装与配置方法, and it also explores how SSH offers two levels of remote login verification, which is pretty cool.
Why IoT Devices Need SSH
IoT devices, by their very nature, are often spread out and might be in places that are hard to get to physically. Think about a sensor in a remote field, or a smart thermostat in a vacation home; you can't just walk up to them to make changes or get data. This is where a secure remote access method becomes absolutely necessary, and SSH fits that need really well.
Using SSH for these devices means you can update their software, check their status, or collect data without having to be physically present. It also means that any sensitive information they collect, or any commands you send them, are protected from prying eyes. Without this kind of security, your IoT setup could be open to all sorts of problems, so, it's a critical piece of the puzzle.
Setting Up SSH on Your IoT Device
Before you can connect to your IoT device using SSH, you usually need to make sure that the device itself has an SSH server running. Many smaller computers, like Raspberry Pis or similar single-board devices that are popular for IoT projects, come with SSH capabilities built in or can have them easily added. The process often involves just a few commands on the device's own terminal to turn on the SSH service, which is actually quite straightforward.
For example, on a Linux-based IoT device, you might use a command like `sudo systemctl enable ssh` and then `sudo systemctl start ssh` to get the server going. It is a good idea to also set up a strong password for your user account on the device, or even better, configure key-based authentication right from the start. This initial setup on the device side lays the groundwork for all your secure remote interactions, so, it's a first step you can't skip.
Connecting from Your Computer to the IoT Device
Once your IoT device is ready to accept SSH connections, your next step is to connect to it from your personal computer. Whether you are using Windows, macOS, or Linux, the general idea is the same: you use an SSH client program to reach out to the remote device. The ssh command instructs the system to establish an encrypted secure connection with the host machine, and this is the basic tool you will use.
Configuring SSH on Windows with PowerShell
For those using Windows, the built-in OpenSSH client through PowerShell is a very handy tool. You might wonder, How do I set the host name and port in a config file for windows, using openssh through powershell? Well, you can create or edit a configuration file that stores connection details for your remote devices, making it much simpler to connect later.
To do this, you would typically create a file named `config` inside your `.ssh` folder, which is usually found at `C:\Users\YourUsername\.ssh\`. Edit or create the file now by typing a command like `notepad $HOME\.ssh\config` in PowerShell. Inside this file, you can add entries for each of your IoT devices, specifying their hostnames or IP addresses, the user account to use, and even a specific port if it is not the standard SSH port 22. This variable sounds like what I am looking for, but it is not defined, so, just remember to replace `YourUsername` with your actual Windows username.
An entry in your `config` file might look something like this:
Host myiotdevice HostName 192.168.1.100 User iotuser Port 2222Making Your First SSH Connection
Once you have your configuration ready, or if you prefer to type everything out, connecting is pretty straightforward. You open your terminal or PowerShell and use the `ssh` command. User_name represents the account that is being accessed on the host, so you would typically type something like `ssh iotuser@192.168.1.100` or, if you set up the config file, just `ssh myiotdevice`.
The first time you connect to a new device, your SSH client will ask you to confirm the device's identity. This is a security check to make sure you are connecting to the right place and not some imposter. You will usually see a message about the host's fingerprint, and you should type `yes` to continue if it looks correct. After that, you will be asked for the password for the `iotuser` account on your device, and then you should be connected, which is actually quite satisfying.
To effectively manage remote servers via ssh, use both interactive ssh sessions and direct ssh commands, as they both offer different ways to get things done. An interactive session is where you get a command prompt on the remote device, letting you type commands one by one. Direct commands, on the other hand, let you run a single command on the remote device without opening a full session, which can be very useful for automated tasks.
Secure File Transfers with SSH for IoT
A common need when working with IoT devices is to move files back and forth. You might need to upload a new program to your device or download data logs from it. SSH provides secure ways to do this, primarily through tools like `scp` (secure copy) and `sftp` (SSH File Transfer Protocol). This connection can also be used for terminal access, file transfers, and for tunneling, which is pretty handy.
Downloading Files from a Remote Server
Let's say you want to download files from a remote server to my local drive, and do it from the command line. I also want to be able to do this over ssh. How can I do this? The `scp` command is a great choice for this. You specify the source file on the remote device and the destination path on your local computer.
For example, to download a log file from your IoT device, you might type something like:
scp iotuser@myiotdevice:/var/log/sensor_data.log C:\Users\YourUsername\Documents\Uploading Files to Your IoT Device
Similarly, if you want to transfer my local file to server by using linux terminal, `scp` works in the other direction too. Suppose we used to access server by putty or ssh but not able to transfer there file by on same terminal. With `scp`, you specify the local file as the source and the remote path as the destination.
To upload a new program, say `update.py`, from your local machine to your IoT device's home folder, you would use:
scp C:\Users\YourUsername\Desktop\update.py iotuser@myiotdevice:/home/iotuser/SFTP and Windows File Explorer
A common question arises: I require one of my client to connect to a sftp server using windows file explorer. The explorer has an option to connect to a ftp server but not a sftp server. Is there a way to make this work directly? Unfortunately, the standard Windows File Explorer does not natively support SFTP connections, only FTP.
To connect to an SFTP server from Windows with a graphical interface, you typically need to use a separate SFTP client application. PuTTY is an ssh and telnet client, developed originally by Simon Tatham for the Windows platform, and its associated tools, like PSCP and PSFTP, can handle these transfers from the command line. For a graphical experience, tools like WinSCP or FileZilla are popular choices that provide a user-friendly interface for SFTP, making file management much easier, which is actually very helpful.
Managing SSH Keys for Better Security
While passwords are fine for basic SSH use, using SSH keys offers a much stronger and more convenient way to authenticate. Instead of typing a password every time, you use a pair of cryptographic keys: a private key that stays on your computer and a public key that you place on the remote IoT device. When you connect, the two keys work together to prove your identity without ever sending your password over the network, which is a very secure method.
Sometimes, you might have multiple keys and need to specify which one to use. The documentation is not clear on how to explicitly use only that key, but you can do this using the `-i` option with the `ssh` or `scp` command, followed by the path to your private key file. For example: `ssh -i C:\Users\YourUsername\.ssh\my_iot_key iotuser@myiotdevice`. This ensures that only the intended key is used for that specific connection, which is a rather important detail for security.
Troubleshooting Common SSH Challenges
Even with the best planning, you might run into a few bumps when working with SSH. Knowing how to handle these common issues can save you a lot of time and frustration. These are usually simple fixes, but they can seem a bit puzzling at first, you know?
Dealing with IP Address Changes and Warnings
Imagine this scenario: 48 one of the servers I frequently log into via ssh has changed its ip address. So, now I'm getting man in the middle attack warnings when I try to use ssh via windows powershell. This is a common and important security warning. SSH remembers the "fingerprint" of the remote server based on its IP address and hostname.
When the IP address changes, or if the remote server's key changes, SSH thinks it might be a different server trying to trick you. To fix this, you need to update your local SSH known_hosts file. The warning message usually tells you which line in the `known_hosts` file to remove. You can typically open this file (located at `C:\Users\YourUsername\.ssh\known_hosts` on Windows) with a text editor and delete the offending line. After that, the next time you connect, SSH will ask you to confirm the new fingerprint, and you can accept it, which is actually quite simple to do.
Discovering SSH Capabilities Dynamically
Sometimes, you might need to know what specific encryption methods or key exchange algorithms a remote SSH server supports. Is there a way to make ssh output what macs, ciphers, and kexalgorithms that it supports? I'd like to find out dynamically instead of having to look at the source. Yes, there is a way to do this without digging into source code or server configurations.
You can use the `ssh` command with a special debug option, like `ssh -vvv youruser@yourhost`, which provides a very detailed output of the connection process. This verbose output will list the various algorithms that the client and server are trying to negotiate, including the supported MACs, ciphers, and key exchange methods. It gives you a clear picture of what's available for secure communication, which is a rather useful bit of information for advanced setups.
Advanced SSH Uses for Your IoT Setup
Beyond just logging in and transferring files, SSH offers more powerful capabilities that can be very beneficial for managing your IoT devices. These advanced uses can help you create more complex and secure network setups. It's like having a Swiss Army knife for your remote connections, you know?
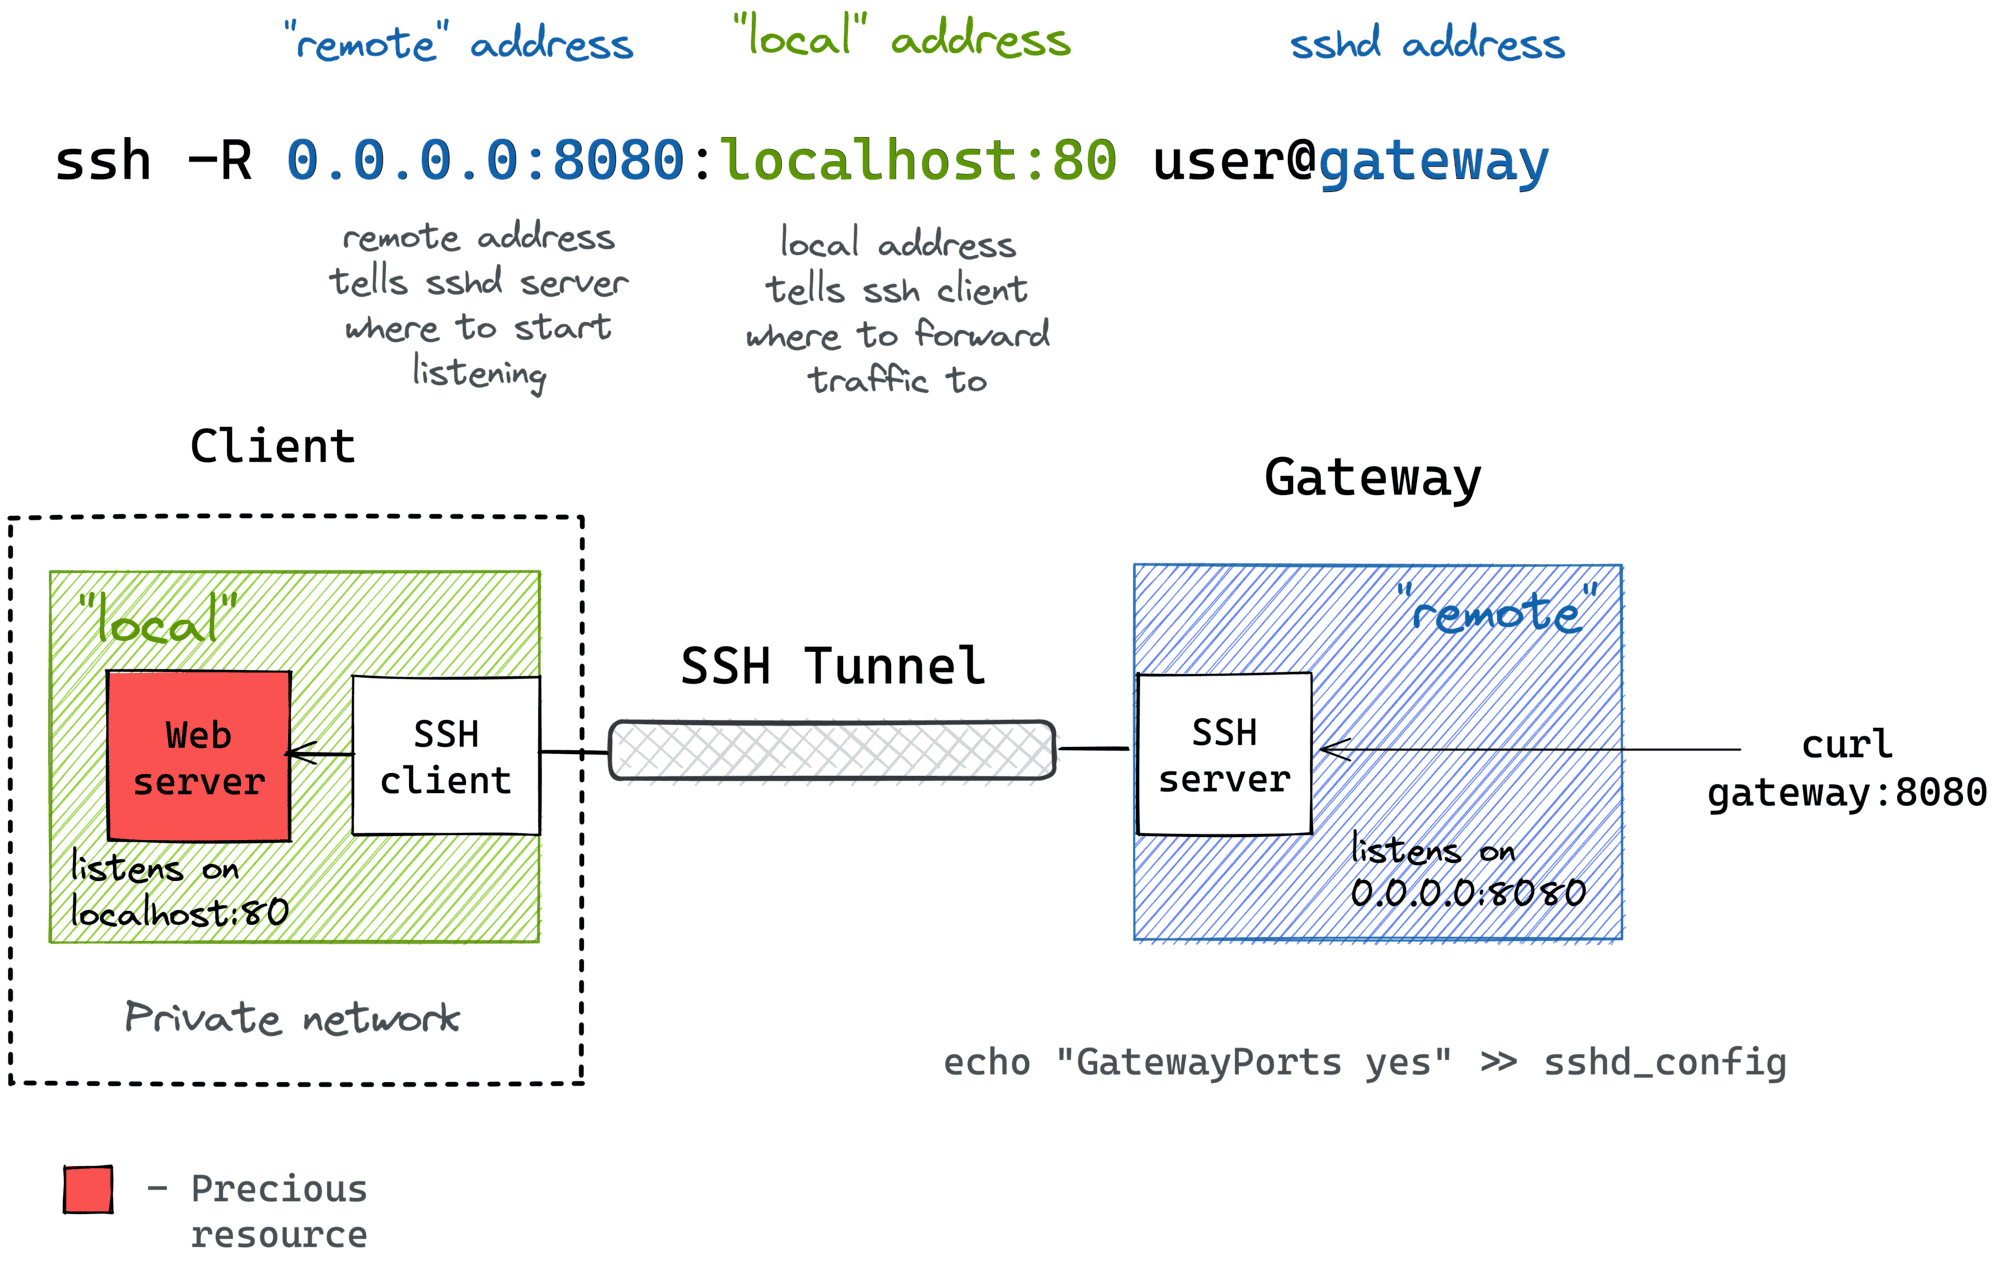
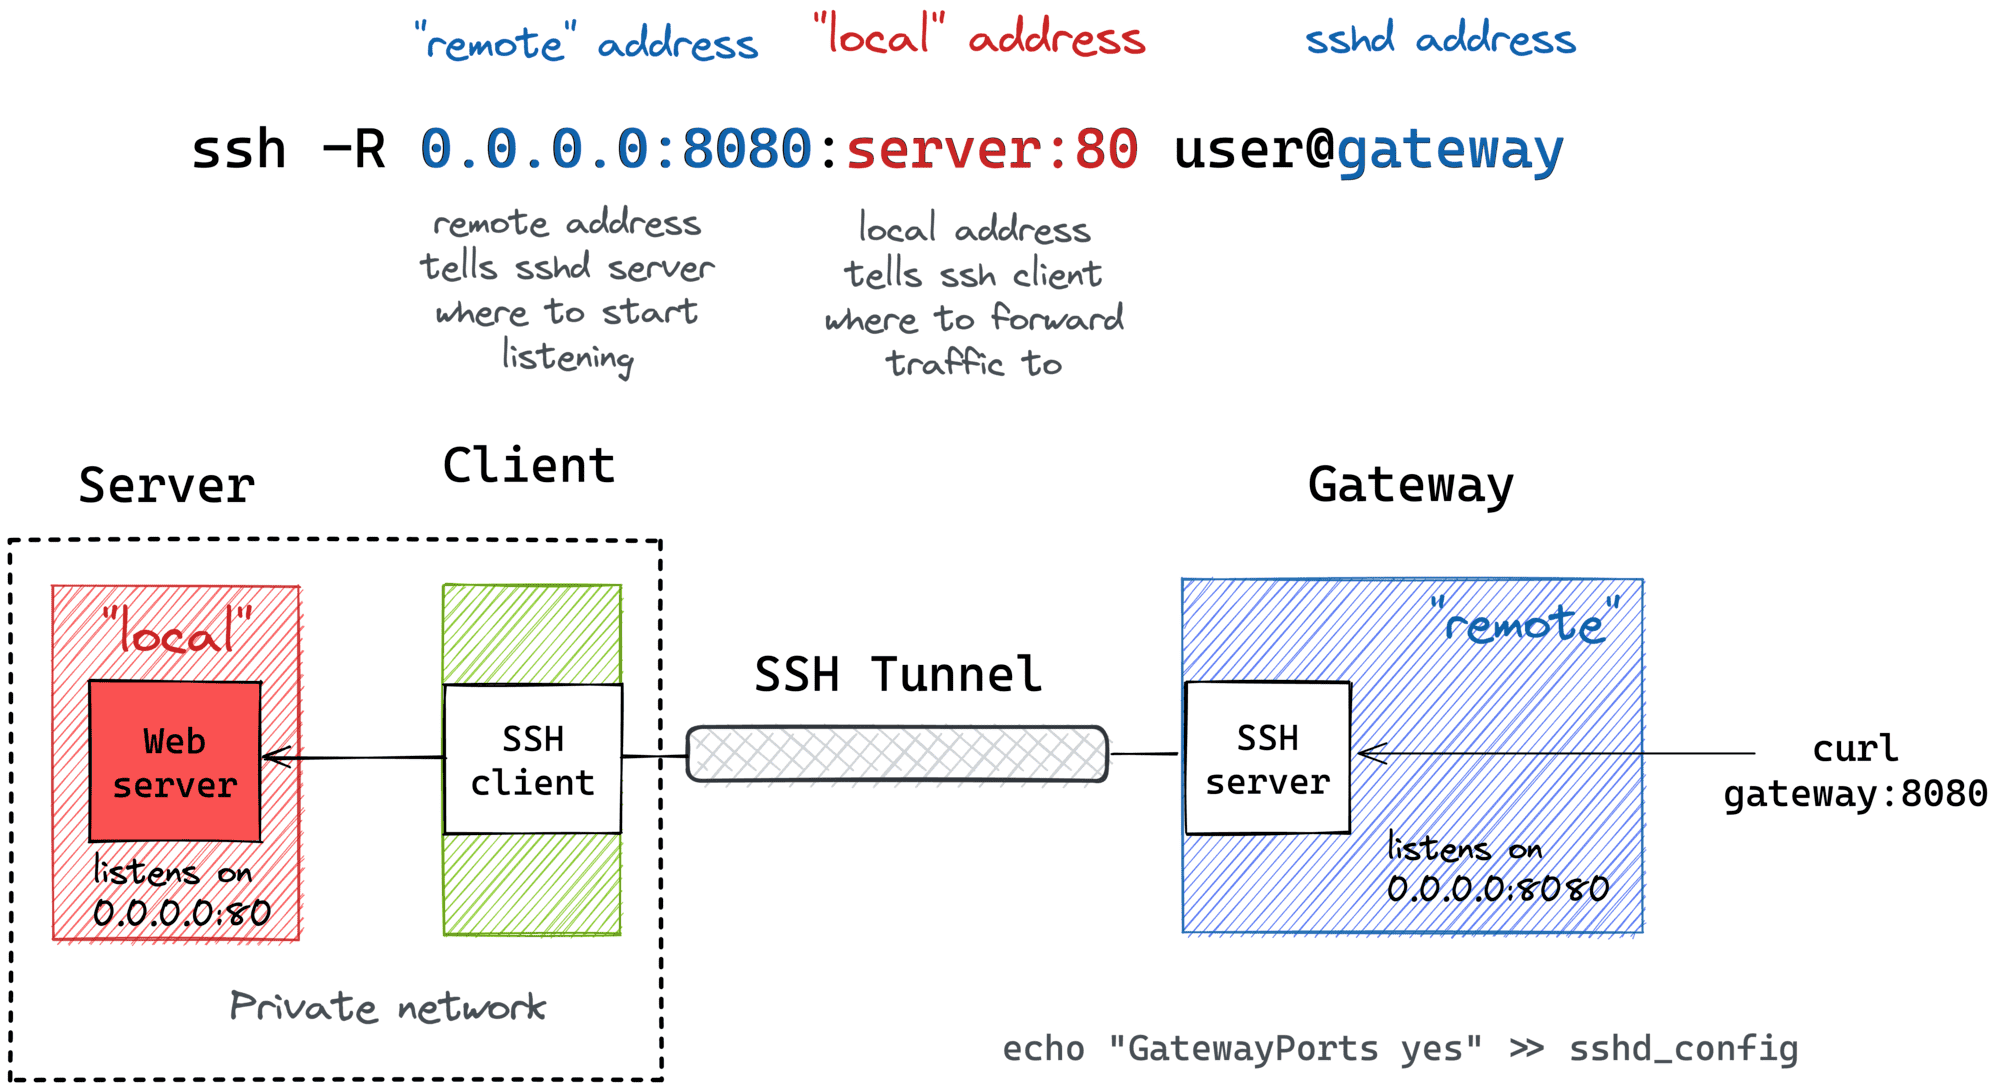
One such use is port forwarding, also known as SSH tunneling. This connection can also be used for terminal access, file transfers, and for tunneling. It allows you to securely send traffic from one port on your local machine to a port on the remote IoT device, or even to another machine accessible from the IoT device, all through the encrypted SSH tunnel. This is incredibly useful for accessing web interfaces or other services running on your IoT device that might not be directly exposed to the internet.
For instance, if your IoT device runs a small web server on port 8080, you could set up a local port forward so that when you access `localhost:8000` on your computer, the traffic is securely sent to `myiotdevice:8080`. The command for this would look something like `ssh -L 8000:localhost:8080 iotuser@myiotdevice`. This way, you can interact with your device's web interface as if it were running on your local machine, which is a very secure and convenient way to work.
Another powerful aspect is running remote commands directly. You don't always need a full interactive session. You can execute a single command on your IoT device by simply adding the command after your SSH connection details, like `ssh iotuser@myiotdevice "ls -l /data"`. This will run the `ls -l /data` command on the remote device and show you the output on your local terminal, then disconnect. It is a very efficient way to automate tasks or check quick statuses without full login, you see.
This table provides an overview of frequently used commands:
- `ssh [user@]host`: Connects to a remote system.
- `scp [source] [destination]`: Copies files securely.
- `sftp [user@]host`: Starts an interactive file transfer session.
- `ssh-keygen`: Generates SSH key pairs.
- `ssh-copy-id [user@]host`: Copies your public key to a remote system.
- `ssh -L [local_port]:[remote_host]:[remote_port] [user@]host`: Sets up local port forwarding.
![The “ssh” Command in Linux [18 Practical Examples]](https://linuxsimply.com/wp-content/uploads/2023/01/ssh-command-in-linux-2-1536x1031.png)
